
How I Cooked Chicken So Juicy My Family Got Totally Obsessed — The Method Behind It
It starts with a brine. Most things worth making do.
Juicy chicken is not luck. It is the result of two decisions made before the pan is ever heated: how the chicken is prepared, and how it is cooked. This recipe produces chicken so consistently moist and well-seasoned that it has become the most-requested dinner in my household — not because it is complicated, but because the technique is sound and the result is reliable every time.
Prep Time: 10 minutes (plus 1–8 hours brining) | Cook Time: 25–30 minutes | Total Time: 35 minutes active | Servings: 4

What Makes It Worth Making
- The brine does the work. Salted water penetrates the muscle fibers and seasons from the inside out — no amount of surface seasoning replicates this.
- It is forgiving. A brined chicken thigh cooked 5 minutes past ideal is still moist. An unbrined breast is not.
- The method is transferable. Once you understand the sear-and-finish technique, it applies to every cut of chicken, every flavor direction.
- It reheats well. Day-two chicken from this recipe, sliced cold over a salad or warmed briefly in a pan, holds its texture in a way that most cooked chicken does not.
The Ingredients
For the brine:
- Cold water (1 liter): The base. Temperature matters — warm water begins to cook the exterior of the chicken during brining.
- Kosher salt (40g, approximately 2 tablespoons): The functional element. Salt denatures surface proteins and draws moisture deeper into the muscle. Do not substitute table salt at the same volume — it is finer and significantly saltier by weight.
- Sugar (1 tablespoon): Promotes browning during the sear via caramelization. It does not make the chicken taste sweet.
- Garlic (3 cloves, lightly crushed): Aromatic. Subtle in the finished dish, but present.
- Black peppercorns (1 teaspoon): Background heat. Whole peppercorns release slowly into the brine without over-peppering.
For the chicken:
- Bone-in, skin-on chicken thighs (4 pieces, approximately 1kg total): The correct cut for this method. The bone conducts heat evenly from the interior; the skin renders and bastes the meat during cooking. Boneless skinless thighs work with a reduced cook time. Breasts work but require more attention — they have less fat and a narrower window between done and dry.
- Neutral oil (1 tablespoon): For searing. Use avocado or vegetable oil — both handle high heat without smoking prematurely. Olive oil burns at the temperature needed for a proper sear.
- Unsalted butter (1 tablespoon): Added to the pan during the oven finish. It browns and bastes as it melts, contributing flavor that oil alone cannot.
- Fresh thyme (4 sprigs): Placed in the pan during the finish. The heat releases the oils without cooking off the volatile aromatics entirely.
- Garlic (2 cloves, halved): Cut-side down in the pan. It perfumes the butter without burning.
- Lemon (½, for finishing): Squeezed over the chicken immediately before serving. Acid at the end sharpens everything.
- Flaky sea salt: For finishing, after cooking. Fine salt applied before serving reads as sharp and forward; flaky salt dissolves more slowly and reads as clean.
How to Make It
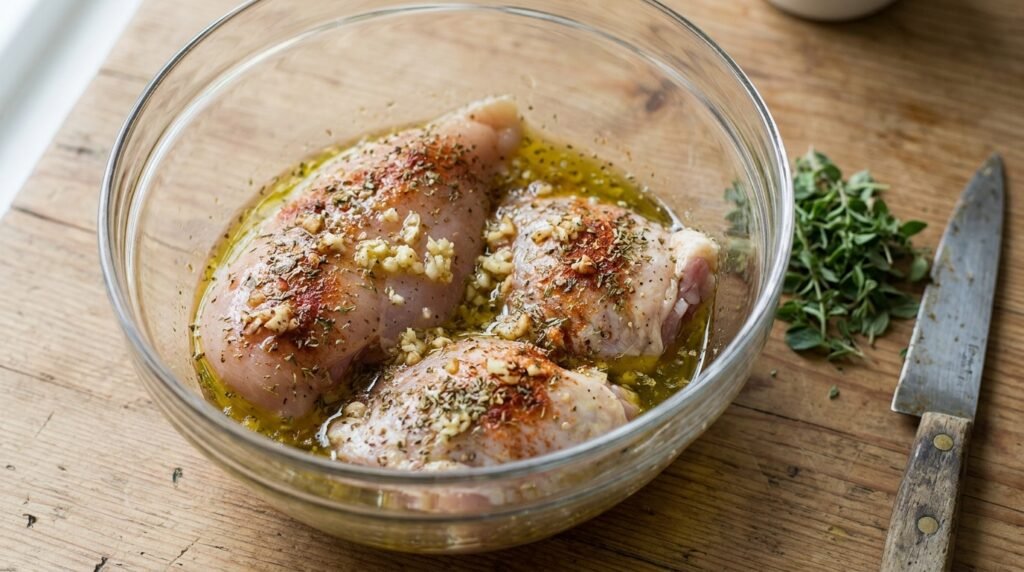
- Brine the chicken. Dissolve salt and sugar in water. Add garlic and peppercorns. Submerge chicken thighs completely. Refrigerate for a minimum of 1 hour, maximum 8. Beyond 8 hours the texture begins to change — the exterior becomes slightly soft from prolonged salt exposure.
- Remove and dry thoroughly. Take chicken out of the brine. Pat every surface completely dry with paper towels — top, bottom, between the skin and flesh where possible. Moisture on the surface creates steam during the sear and prevents browning. This step is easy to rush. Don’t.
- Rest at room temperature for 20 minutes. Cold chicken hitting a hot pan drops the pan temperature unevenly and produces inconsistent cooking. Twenty minutes is enough.
- Preheat the oven to 200°C (390°F). Place a rack in the middle position.
- Heat an oven-safe skillet — cast iron preferred — over medium-high heat for 2 full minutes. Add oil. When the oil shimmers and a faint haze appears, the pan is ready.
- Sear the chicken skin-side down. Place thighs in the pan without crowding. Do not move them for 6–7 minutes. What’s happening is the skin is rendering its fat and developing a crust through direct contact with the hot surface. Lifting too early tears the skin and interrupts the browning.
- Flip once. The skin should release cleanly when ready — if it sticks, wait another minute. Sear the flesh side for 2 minutes.
- Add butter, thyme, and garlic to the pan. Tilt the pan slightly and spoon the melted butter over the chicken every 30 seconds for 2 minutes. This is basting — it adds flavor and promotes even browning on the flesh side.
- Transfer the skillet to the oven, skin-side up. Roast for 15–18 minutes until the internal temperature reads 74°C (165°F) at the thickest point, not touching bone.
- Rest for 5 minutes before serving. The juices redistribute during this time. Cutting immediately loses them to the cutting board.
- Finish with lemon juice and flaky salt. Apply both immediately before plating. Not before — acid added too early dulls the skin.
A Few Things Worth Knowing
Dry the chicken as if it matters. It does. Surface moisture is the enemy of a good sear. Paper towels, pressed firmly, on every surface. The skin should feel almost tacky before it hits the pan.
Do not move the chicken during the sear. The skin releases naturally when the crust is developed. Forcing it before then tears the skin and leaves it stuck to the pan. Trust the timing and leave it alone.
The brine already seasoned the chicken. Do not add salt before searing. The brine penetrated the muscle — additional surface salt before cooking over-seasons the exterior relative to the interior. The flaky salt at the end is the only post-brine seasoning needed.
Cast iron holds heat better than stainless or non-stick. Adding cold chicken to a lighter pan drops the surface temperature significantly, which causes the skin to stick and steam rather than sear. If cast iron is unavailable, stainless steel is the next best option. Non-stick does not tolerate the heat required for this technique.
The result is better the next day reheated properly. Slice cold chicken and warm it in a pan with a small amount of butter over medium heat, skin-side down, for 3–4 minutes. It does not reheat well in a microwave — the moisture leaves unevenly and the skin goes soft.
Check temperature, not time. Oven variability, pan variability, and thigh size all affect cook time. A thermometer removes every variable. Pull at 74°C. The carryover heat during resting will bring it to 77°C, which is the target.
How to Serve It
Over a simple green salad dressed with lemon and olive oil: the pan juices can be spooned directly over the top as a warm dressing.
With roasted potatoes cooked in the same oven at the same temperature: they finish together, the timing aligns, and nothing requires separate management.
With braised white beans or lentils: the richness of the skin and the butter sits well against a starchy, simply seasoned base.
Presented skin-side up, always. The seared skin is the visual and textural focal point — obscuring it makes the dish look unfinished.
With a glass of unoaked Chardonnay or a light Pinot Noir: both work alongside the butter and herb notes without competing.

Worth Noting Nutritionally
Bone-in, skin-on chicken thighs are higher in fat than breasts — approximately 15–18g of fat per thigh, much of it rendered during cooking. The remaining fat in the skin contributes to the flavor and texture that makes this recipe work.
For lower fat: Remove the skin before serving, after cooking. Cooking with the skin on and removing it after retains more moisture than cooking skinless from the start.
For lower sodium: Reduce brine time to 45 minutes and use 25g of salt instead of 40g. The seasoning will be lighter but the moisture benefit largely remains.
For a different cut: Boneless thighs work well — reduce oven time to 10–12 minutes. Breasts require more care — brine for no more than 2 hours (the leaner muscle over-brines faster) and pull at exactly 70°C internal, allowing carryover to finish the job.
A Few Questions
Can I brine overnight? Eight hours is the upper limit for thighs. Beyond that, the exterior texture softens noticeably — the brine continues working past the point of benefit. If you need to brine overnight, reduce salt to 25g and keep the chicken submerged and cold for no longer than 10 hours.
What if I don’t have an oven-safe pan? Sear in whatever pan you have, then transfer the chicken to a baking dish or sheet pan for the oven portion. You lose the pan drippings for basting, but the result is still sound. Use a rack in the baking dish so the bottom of the chicken doesn’t steam against the pan surface.
Can this be made ahead for a dinner party? Partially. Brine and dry the chicken up to 8 hours ahead. The sear and finish must happen close to serving — rested, reheated chicken is good, but the skin is best within 10 minutes of coming out of the oven. For a party, sear the chicken 20 minutes before guests sit down and finish it in the oven while you serve the first course.
Why bone-in over boneless? The bone conducts heat from the interior of the thigh outward, which produces more even cooking throughout the meat. It also adds flavor to the pan drippings. Boneless thighs cook faster and are easier to portion, but the bone-in version produces a more flavorful, more evenly cooked result. For a weeknight, either works. For a dish the family requests again, bone-in.
Make it once with care, and it becomes the recipe you stop thinking about — because the result is always there.